Wednesday, July 10, 2019

Colour Inkspiration #CI59 - Guest Designer


I recently won Colour Inkspiration challenge #CI57 and was delighted to be invited to join the design team as guest designer for their inspiration blog hop for #CI59.
You can see my winning card here


The Colour Inkspiration Design Team match up Stampin' Up! colours to photos chosen from Pinterest to create a colour palette which is to be used to create a project.
Every 2nd and 4th Wednesdays of the month a new colour palette is uploaded and the Design Team provide inspiration with a blog hop.


When I received the colours for this challenge, I immediately thought winter scene, then I thought maybe nautical but finaly ended up with something completely different......


I decided to create a masculine card (we never have enough of them) and used a sentiment rather than an image for inspiration.
The card base is a piece of Early Espresso cardstock 21 x 14.85cms scored at 10.5 cms.
Onto this I layered a piece of Early Espresso cardstock 14.35 x 10 cms which I stamped with the background stamp set Birch in Early Espresso ink. Before adhering the layer, I placed a small brad in the centre towards the top to 'hang' my wall art on.
I then embossed a piece of Very Vanilla cardstock 11 x 8.5 cms with the Pinewood Planks 3D folder. I sponged the planks with Smoky Slate, Seaside Spray and Early Espresso ink and then cut them into individual pieces.


Using the masking technique, I then stamped each plank with a line of the sentiment using Early Espresso ink.
Next I punched 2 holes at either end of the planks 1.2 cms in from the edge.
I threaded a piece of Nature's Twine through the holes starting with the lowest hole on the left, which I secured with a knot, and then working my way up to the top leaving enough twine to 'hang' the wall art and then continuing down the right side which I again secured with a knot at the bottom.
I then randomly trimmed the planks and attached them to the Early Espresso stamped layer with Dimensionals.


Product List
Colour challenges really are a great way to kick start your creativity. If you'd like to join the fun, click here to be redirected to the Colour Inkspiration Facebook page where you can request to join the group and upload your creation.

Click on the 'Next' button below to keep hopping and see all the projects created by the team.
Next up is the amazingly talented Kelly Kent with a beautiful card using the gorgeous Seaside Notions stamp set.


Friday, July 5, 2019

Paper Adventures Team Blog Hop - Christmas in July


I'm so honoured to have been invited to join Kelly Kent's Paper Adventure Team's monthly blog hop as the Guest Designer! When Kelly told me the theme was Christmas in July, I suddenly realised that half of this year is over already - where did the time go!
I decided to do what I love best and make a 3D project. I chose to make a centrepiece for our Christmas table with a nod to my mum who is from the UK and who loves traditional Christmas.


I used the Reindeer stamp from the Dashing Deer stamp set which is in the 2019-2020 Annual Catalogue and the Santa's Sleigh Framelits which have retired but can be purchased  from our Clearance Rack at a bargain price.


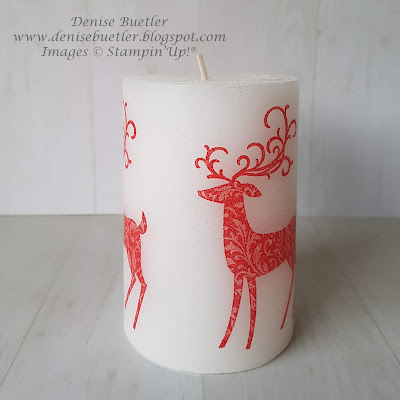
I started by stamping my candle with the reindeer using Real Red ink. I stamped the image 3 times on tissue paper and then cut around the image so that there was just a small border of tissue paper.
I then placed the tissue paper with the image where I wanted it on my candle and covered this with a piece of wax paper. I cut the wax paper long enough to be able to hold the tissue paper tightly in place and then heated the image with my Heat Tool until the tissue paper melted into the candle.
I then did the same with the other two images placing them at an equal distance apart.
To make my candle sparkle, I rolled it in Dazzling Diamonds glitter.


Next I die-cut 4 sleighs from Pool Party cardstock and 4 decorative pieces from the Sparkle Glimmer Paper (2 were cut from the glimmer side and 2 from the reverse side in order to obtain a mirror image). I then adhered the glimmer pieces to the cardstock.
To join the two sides of the sleigh together, I cut 2 pieces of Pool Party card stock (1 for each sleigh) 3 1/8" x 1 3/4" and scored at 1/4" and 1 1/2" along the short side and 1" and 1 1/2" along the long side. I burnished the score lines and cut notches at the score lines on the long side so that I could curve the joining piece to follow the line of the sleigh. I then adhered this to the two sleigh sides using wet glue.


For the reindeers I die-cut 2 pieces for each reindeer - one from the glimmer side and one from the reverse side and adhered them together using wet glue. To join 2 reindeers together I cut 2 pieces of glimmer paper 1/2" x 2 1/4", glued them together and scored at 1/2" from each end.


For each 3D tree I die-cut 5 trees from the Santa's Sleigh Framelits using Mossy Meadow card stock. I then sponged each piece using Craft Whisper White ink and scored each piece down the middle using my Stampin' Trimmer. I then inked up each piece with Versamark and heat embossed with Heat & Stick Powder. Once the glue had melted I dipped them in Dazzling Diamonds glitter. I folded and adhered all five pieces together with wet glue. To give my trees a snowy effect, I mixed Dazzling Diamonds glitter with Embossing Paste and dabbed the mixture onto the ends of the branches.
The sacks are little calico spice bags that I hand stamped with the little Christmas tree from the retired stamp set Jingle All The Way.


Next up is the super talented Siobhan who no doubt has something very special to show you.
Thanks for hopping with us and I hope our projects will inspire you to start your Christmas projects early.